Newsletters
 |
Sawmill Newsletter December 15, 2006 |
Welcome to the Sawmill Newsletter!
You're receiving this newsletter because during the downloading of Sawmill, you checked the box to join our mailing list. If you wish to be removed from this list, please send an email, with the subject line of "UNSUBSCRIBE" to newsletter@sawmill.net .
News
We're reviving the long-dormant Sawmill Newsletter! Each issue will have a "tips and techniques" article, describing how to do something fancy with Sawmill. This issue describes the use of CFG files to include external metadata in your Sawmill reports, which lets you pull in data from other databases and integrate it with Sawmill.
We are currently shipping Sawmill 7.2.8. You can get it from http://sawmill.net/download.html .
Tips & Techniques: Using .cfg Maps to Embed External Metadata in Sawmill Reports
Sawmill is a log analyzer, and the default reports it generates are based entirely on data contained in the log data. But in many cases, the information in the log data is a potential "key" to additional information, stored in a database or elsewhere. For instance, a log entry in a web log might contain a URL parameter which contains an order ID, which is the key to a database record (in an external database) with information about the order, including items purchased, purchase price, and more. Further, the order record might contain a customer ID, which is the key to another table, possibly in another database, with information about the customer, including name, organization, etc. This external metadata (external because it is not in the log file) can be used by Sawmill, and included in the reports Sawmill generates, if you export it to CFG format, and refer to it from log filters in your profile. This article describes how, and gives a concrete example.
For the example, we will assume that the profile analyzes Apache web logs, and that the "page" field of the log contains a URL like this one for completed orders:
/store/thanks_for_buying.html?order_id=12345
We assume that there is a database with an "orders" table which contains columns order_id and customer_name fields.
Step 1: Create Custom Fields
Sawmill doesn't know about the external fields when you create the profile, so it doesn't create the necessary components in the profile to track them. Your first step is to create these components. There are six parts to this; the first three are essential:
1. A log field, to manipulate the value
2. A log filter, to set the value of the log field, using the external metadata source
3. A database field, to store the value in the database
The next three are optional:
4. A report, to display the value in a table
5. A report menu item, to create a link at the left of the reports to view the report
6. A cross-reference table
If you don't create a report, you can still filter on the values in this field, using the Filters window of the Reports interface. If you don't create a report menu item, you can still access the report from the Scheduler or the command line, and use filters on the database field. If you don't create a cross-reference table, the report will be much slower than if you do.
For details on these steps, see:
http://www.sawmill.net/cgi-bin/sawmill7/docs/sawmill.cgi?dp+docs.faq.entry+webvars.entry+custom_fields
For this example, we create three custom fields, called customer_name, item, and cost. We will create a single log filter to set all three fields below in Step 3: Create the Log Filter. But first, we will create the CFG file, which Sawmill will use to look up order information.
Step 2: Create the .cfg File
To give Sawmill fast access to the data in the "orders" table, we need to create a file in Sawmill's CFG format. This can be done manually with a text editor, or by writing a script or program to query the database and generate the file. In this example, we will call the file "orders.cfg". The contents of the file is:
orders = { 12345 = { customer_name = "John Jones" item = "Mouse" cost = "15.00" } 12346 = { customer_name = "Sue Smith" item = "Monitor" cost = "129.00" } } |
For example, order number 12345 was an order by John Smith for a $15.00 mouse, and order number 12346 was an order by Sue Smith for a $129.00 monitor. In real-world data, there could be much more information here, including the exact model and manufacturer of the monitor and mouse, credit card information, tax information, etc. But for this example, we'll only be using these three fields.
The first line of the file must match the name of the file (minus the .cfg extension).
Step 3: Create the Log Filter
Now that we have created orders.cfg, we have implicitly created a configuration node called "orders", which can be accessed from Salang (the Sawmill Language, the language of log filters) as "orders". Therefore, we can now create a log filter like this:
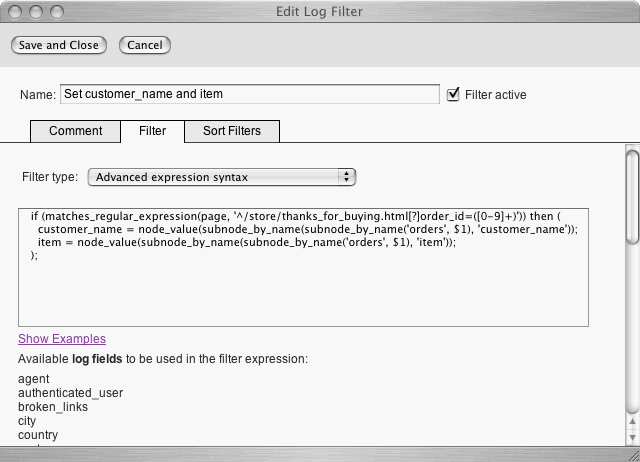
| if (matches_regular_expression(page, '^/store/thanks_for_buying.html[?]order_id=([0-9]+)')) then ( customer_name = node_value(subnode_by_name(subnode_by_name('orders', $1), 'customer_name')); item = node_value(subnode_by_name(subnode_by_name('orders', $1), 'item')); ); |
This expression checks for a page field with the correct format (using a regular expression); if it matches, the order ID will be in the variable $1. Then, it uses subnode_by_name() to look up the subnode of 'orders' which matches $1 (the order record for the order_id from the URL), and then uses subnode_by_name() again to get the customer_name. It then repeats the process for the item.
You can create this filter by clicking Config, then Log Data -> Log Filters, then New Log Filter at the upper right, then the Filter tab, then choosing "Advanced expression syntax" as the filter type, entering a name for it in the Name field, and entering the filter expression in the main field:
Step 4: Build the Database, and View the Reports
Now rebuild the database, and view the reports. There should be a "Customer Names" report, and "Items" report, showing the number of hits (orders) for each customer, and the number of hits (orders) for each item. You can now use these reports like any other report; e.g., you can click on a particular Item, then zoom to Countries/Regions/Cities, to see which countries of the world purchased that item.
Advanced Topic: Add a Numerical Field
To take it a step further, let's add the "cost" field too. This is a numerical field, rather than a "non-aggregating" field like customer_name and item. It is most useful as a "summing" field, which can appear as a column in any table, and sums the values for each row. To create a custom numerical field, create a log field as before, but use this as the database field:
| cost = { label = "cost" type = "float" log_field = "cost" display_format_type = "two_digit_fixed" suppress_top = "0" suppress_bottom = "2" } # cost |
Setting the type to "float" specifies that this is a floating-point aggregating field, capable of holding and aggregating floating point values (including fractional values, like cents). Then change the log filter to include a new "cost" line:
| if (matches_regular_expression(page, '^/store/thanks_for_buying.html[?]order_id=([0-9]+)')) then ( customer_name = node_value(subnode_by_name(subnode_by_name('orders', $1), 'customer_name')); item = node_value(subnode_by_name(subnode_by_name('orders', $1), 'item')); cost = node_value(subnode_by_name(subnode_by_name('cost', $1), 'cost')); ); |
This extracts cost exactly the way the other two lines in the filter extracted customer_name and item.
Now, rebuild the database, and go to Config->Manage Reports->Reports/Reports Menu. Edit the Items report you create, and edit its only report element, and in the Columns tab, add Cost as a column. Then View Reports, and click the Items report, and you'll see the total dollar value (sum) of the sales for each item, in the Cost column. The Cost column can be similarly added to any other table or table-with-subtable report. For instance, if you add it to the Years/Months/Days report, you'll be able to see sales by year, month, or day.
For best performance of reports including a "cost" column, you can add "cost" to the cross-reference table for that report (the one containing the columns of that report), by editing cross_reference_groups in the profile .cfg file, and adding a "cost" line to each group.
[Article revision v1.10]