Newsletters
 |
Sawmill Newsletter February 15, 2007 |
Welcome to the Sawmill Newsletter!
You're receiving this newsletter because during the downloading of Sawmill, you checked the box to join our mailing list. If you wish to be removed from this list, please send an email, with the subject line of "UNSUBSCRIBE" to newsletter@sawmill.net .
News
This issue of the Sawmill Newsletter discusses creating custom fields.
We are currently shipping Sawmill 7.2.9. You can get it from http://sawmill.net/download.html .
| SECURITY ALERT Sawmill 7.2.8 and earlier includes a potential security vulnerability which can allow users to gain administrative access to Sawmill, if they have login permissions (e.g., SSH) on a system where the Sawmill web browser is running, and if they have read access to the cookies of the browser. Sawmill 7.2.9 reduces this vulnerability by using sessions and session cookies, so even if the authentication information is acquired by a malicious user, it cannot be used beyond the end of the current session. This vulnerability is a "moderate" severity; it is not remotely exploitable. For best security, we recommend that all existing Sawmill users upgrade to Sawmill 7.2.9 (a free upgrade for Sawmill 7 users). |
Tips & Techniques: Creating and Populating Custom Fields
| NOTE: This article describes a method for creating custom fields in Sawmill 7, which will not work for newer versions. For newer versions, use the New Field Wizard to create new fields. |
A newly-created profile in Sawmill typically contains one log field for each field in the log data and one database field for each log field, plus various derived database fields (like file_type, which is derived from the filename). It is often useful to have additional fields which are not in the log data, but which can be computed from the log data. For instance, it might be useful to have a Full Name field which is computed from the username or IP, or a Department field which is computed from the IP. Sawmill lets you create any number of custom fields, populate them, filter them, or generate reports from them. Once created, custom fields work just like the other fields in the database.
Step 1: Create the Log Field
The first step is to create a log field. This essentially fools Sawmill into thinking the value is in the log data. Most log fields are populated from the log data, but if you define your own, you can populate it yourself using a Log Filter, and then use it as a Database Field in reports.
To create the log field, edit the profile .cfg file. This is a text file which is in the LogAnalysisInfo/profiles folder of your Sawmill installation folder. You can edit it using a text editor, like Notepad on Windows, or vi or emacs on other systems, or TextEdit on Mac. Find the "log = {" section, and within that the "fields = {" section, and find an existing field, like the spiders field (we'll use a web log for this example). Here's what the spiders field might look like:
spiders = { index = "0" subindex = "0" type = "flat" label = "$lang_stats.field_labels.spiders" } # spiders |
Now copy this section, leave the original(!), and add a new one like this:
full_name = { index = "0" subindex = "0" type = "flat" label = "Full Name" } # full_name |
This defines a new log field full_name, whose label (how it appears in the web interface) is "Full Name".
Step 2: Create the Log Filter
Next we need to give this field a value. For now, let's assume there is a field called first_name and another field called last_name, and all we need to do is concatenate them to get the full name. In Config->Log Data->Log Filters, create a new log filter, and choose Advanced Expression as the type. Then enter this for the log filter:
full_name = first_name . " " . last_name; |
Now, the full_name value for each entry will be the first_name value, followed by a space, followed by the last_name value.
Step 3: Create the Database Field
In order to see reports based on this field, we need to create a database field for it. This is similar to creating a log field. Find the "database = {" section in the profile .cfg file, then find the "field = {" section within in, and then find an existing database field, and duplicate it. Again we'll start with the existing spiders field:
spider = { type = "string" label = "$lang_stats.field_labels.spider" log_field = "spider" suppress_top = "0" suppress_bottom = "2" } # spider |
And modify it to make our custom full_name field:
full_name = { type = "string" label = "Full Name" log_field = "full_name" suppress_top = "0" suppress_bottom = "2" } # full_name |
Step 4: Create a Report
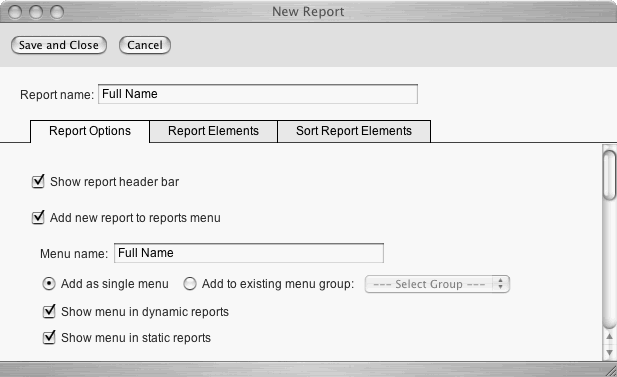
Now that we've created the log field and the database field, we can finish the work in the web interface. The next step is to create a report, and a report menu. Do that by going to Config -> Manage Reports -> Reports/Reports Menu, and clicking New Report. Enter Full Name as the report name and as the menu name:
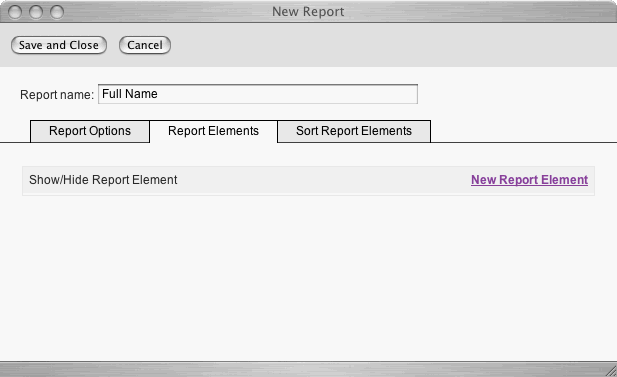
Now, click the Report Elements tab, and click New Report Element:
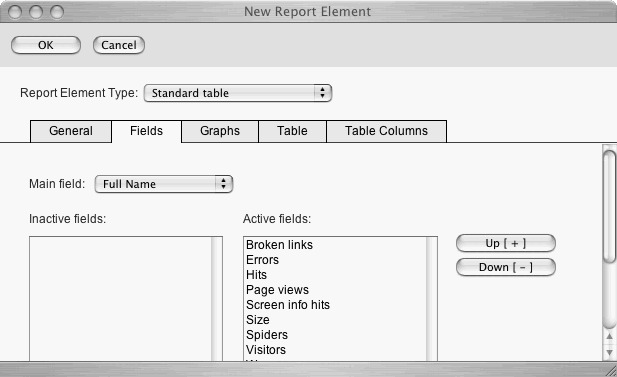
Enter Full Name as the report element name, and choose Standard Table as the Report Element Type:
Click the Fields tab and select Full Name as the main field:
Now click Okay, Save and Close.
Step 4: Rebuild the Database
Now rebuild the database (click Rebuild Database in the Config page), to reprocess all log entries to include the Full Name field. View reports, and you will see a Full Names report at the bottom of the reports list, showing all full names for the dataset.
Advanced Topic: Cross-reference Groups
Though it's not necessary to add a cross-reference group, it will make the Full Names report much faster. To add a cross-reference group, edit the profile .cfg file, and look for "cross_reference_groups = {".
Find the spiders section below it (again, we will base our modification on the spiders field):
spider = { date_time = "" spider = "" hits = "" page_views = "" spiders = "" worms = "" errors = "" broken_links = "" screen_info_hits = "" visitors = "" size = "" } # spider |
and copy it, don't delete the spiders one, to create a new cross-reference group for full_name:
full_name = { date_time = "" full_name = "" hits = "" page_views = "" spiders = "" worms = "" errors = "" broken_links = "" screen_info_hits = "" visitors = "" size = "" } # full_name |
The list of numerical fields will depend on the format, so make sure you base it on a group in your profile, rather than using the example above.
Now rebuild the database, and the Full Names report will be generated from the cross-reference table, rather than from the main table, which is much faster.
Advanced Topic: Using CFG Maps to Populate the Log Field
In this example, we assumed that all information needed to compute full_name was in the existing log fields (first_name and last_name). This is usually not the case, and the field value usually needs to be pulled in from another source. The most common source is a CFG file. For instance, we might create a CFG file which maps usernames or IP addresses to full names, and looks up the full name from that file. See the December 15 issue of the Sawmill Newsletter, "Using CFG Maps", for details on populating log fields using CFG maps.
[Article revision v1.1]